Tuesday, November 29, 2011

Die Cuttin' Divas Guest Designer

Hello All,

Today I am Guest Designing at Die Cuttin' Divas!  This is a first for me, so I'm very excited to share my first Christmas card for this season.  Yes, I need to get busy, I know.  This week is sketch week at DCD, and this was just the motivation I needed to get started.  I'm pleased with how my card turned out.  Let me know what you think.  And then be sure to visit Die Cuttin' Divas to see what the Design Team has made!!


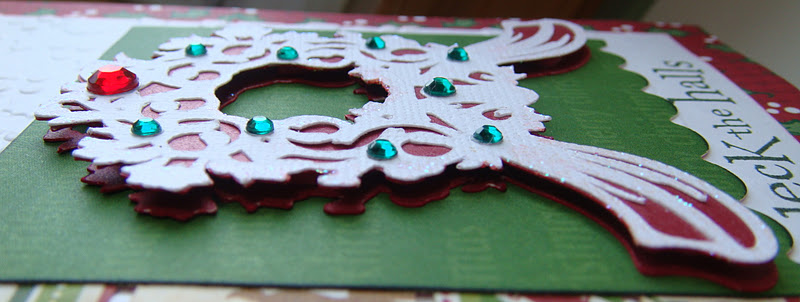
Here's a close-up of the wreath.  Don't you just love these intricate cuts?!

I cut two wreaths and put foam dots in between to layer them.  I really love that look!


And here's the inside of the card which I wanted to match the front, so I bordered the edges with the patterned paper.


Here's the details for my card:

Card is 5-1/2" square.
Red holly patterned paper is from my stash, cut at 5-1/2" to cover the front.
White cardstock is cut at 4-3/4" square and embossed with a Sizzix folder called Snow Globe (for some reason); it's holly and berries design as I hope you can see in my photos.
Merry Christmas paper from my stash for the green mat which I punched with a Fiskars scalloped border punch, and inked the edges. 
The wreath is cut from Trim the Tree seasonal cartridge at 2-3/4".  This cartridge is very, very intricate and cuts best at larger sizes.  But even at this small size, it cut pretty well.  I used adhesive backed cardstock which made it much easier to apply to the underneath layer of red shimmer paper (DCWV).
The banner tags are cut from one 4x6 piece of patterned paper from the DCWV Christmas Combo matstack and inked with Jim Holtz Antique Linen distress ink.
Deck the Halls was $1.00 sentiment from Joann's that I picked up last year.

I'm going to also share this card at You Had Me at Craft link up party.

Thanks for stopping by my blog!  I appreciate all your comments! -- Pat N.

Sunday, November 27, 2011

Welcome New Baby Boy

Here's a card I made for a woman at work.  She gives cards to family and friends with new babies.  This one is for a new baby boy, and I've covered his name in my photo.


I even finished off the inside with coordinating papers and a few Cricut cuts. Couldn't resist!

All the cuts are from New Arrival Cartridge.  The onesie is cut at 4" with shadow; the booties are cut at 1-1/4" w/shadow, and the circle emblem is cut at 2-1/4".  Papers are from DCWV Nana's Nursery-Baby Boy.  Solids come from my stash.  The duck on the onesie is an EK Success punch--isnt't that so cute?!

Thanks for stopping by!  Your comments are welcomed and appreciated.--Pat N.

Monday, November 21, 2011

Ready for Thanksgiving?

IF YOU'RE LOOKING FOR MY BLOGAVERSARY CHALLENGE, CLICK HERE.

Are you almost ready for Thanksgiving?!  Just a few more days to that delicious turkey, stuffing, mashed potatoes, green beans, and sauerkraut! Are you having a similar menu?  Here's a card I made to enter in a few challenges, and to wish everyone a Happy Thanksgiving!

I can see why so many of you used the turkey cut from Create a Critter for your turkey cards!  It's so darn cute!!

How I made this card:    This is a 5x7 card.  I used an orangey/rust colored cardstock for the base.  The background paper is script on a tannish colored paper with subtle hues of orange and green from my stash.  Used green textured cardstock for the strip of matting and for the corners which were punched with an EK Success punch (I love that punch).  Stamped the sentiment on the script paper, trimmed and adhered it to the green strip, and added 2 orange brads.  That is all placed over the same striped paper I used on the turkey, punched with a new border punch I just got by Fiskars called Diamond.  I'm entering this card into the following challenges:

Wacky Wednesday - Thanksgiving project
Die Cuttin Divas - Turkey time
The Cuttlebug Spot - Thanksgiving with a turkey
Whimsical Wednesday - Thanksgiving theme
Cooking with Cricut - Let's Talk Turkey

Please check out my Blogaversary Challenge for a chance to win the Phrases cartridge!  You have until December 5 to enter.  Thanks so much for stopping by!

Friday, November 18, 2011

Are You Ready for a Challenge?

Hello All My Blogging Buddies!!

Are you up for a challenge?  For what, you ask?  Well, it is hard to believe, but I am coming up on my one year blogaversary!  Imagine that!  Yep, it was on December 6, 2010 that I made my first post; it was a birthday card that I entered into a My Pink Stamper challenge.  I was looking back at that and other very early posts, and many of you that visit me regularly now were my VERY FIRST visitors then.  That is pretty amazing, and YOU ARE ALL AMAZING!  I am so thankful and touched by all the sweet blogging buddies I've made over this past year, and it's so enjoyable to communicate with you day to day!  I've never been this passionate about a hobby before that I've actually stayed active with for so long!! (both blogging and crafting!!) It's been wonderful!!

To show my gratitude, I'm having a super giveaway (at least I hope you'll think so!).  It's one of the newer cartridges--Phrases.  I don't think this cartridge has been showcased very much in bloggy world, but I think it's really neat--it has so many phrases included on it, and not just the normal holiday greetings; there's SO much more.  Take a peek at the look book on the Cricut site and you'll see what I mean.

For a chance to win this cartridge, do the following:
  1. Be a follower of my blog, AND
  2. Create a project (card, layout, anything you'd like) to celebrate my one year blogaversary, and have fun with it!
  3. For an extra entry, post my challenge on your sidebar and let me know that you did that by leaving me a separate comment.
The challenge will be open until midnight EST on Monday, December 5, and I'll pick a winner by random.org on December 6.  I've even created a link below for you to post your projects (how 'bout that!?).   I can't wait to see what you make!!!  THANKS TO YOU ALL!

Wednesday, November 16, 2011

The Color Purple

A woman at work asked me to make a card for her sister's 21st birthday, and she told me her sister's favorite color is purple.  I made a similar card back in June for my niece, using different colors.  Here's a purple (and some pink) version.  This cartridge is so fun!
Details for making this card:
Forever Young cartridge; Model 15 cut at 5-1/4" with shadow; mirror cut at 4" with shadow
K&Company Watercolor Bouquet paper; DCWV shimmer purple and silver, pink scraps
Pink gem added to top of mirror; purple gems at the bottom of the card.  I felt like the card needed some more sparkle, so I put pink glitter glue around the mirror as well as on the scalloped edges of the pink strip.

Sunday, November 13, 2011

Little Girl Birthday Card

My daughter needed a birthday card for a little girl's birthday who is just turning 1.  Here's the card I made.   It's a 5x7 card.  I used Birthday Cakes cartridge to cut the princess and the wording with shadows.  And now I can't remember what cart I used to get the background tag since I made this Thursday night! 


Ran the background mat through my Sizzix using the Cuttlebug Polka Dots embossing folder, added a ribbon, and some bling, and there you have it!  Thanks for stopping by!

Saturday, November 12, 2011

Campin Critters Challenge

Curt Jensen of Typecast Creative has a new challenge.  This month it was to create a project using the Campin' Critters cartridge.  Here's what I came up with.  I wanted to turn this into something Christmas, so I took one of the lake, mountain snow scenes and added a Christmas tree.  Then I added some critters in as well. 


Thursday, November 10, 2011

Fashionista Birthday!

Here's a birthday card I made for a co-worker. I like how it turned out--what do you think?

This card is 5x7. Using the Forever Young cartridge, I cut the model at 5-1/4" with shadow.  The word Fashionista is cut at 1-1/4" with shadow.  Patterned paper is from DCWV Hippie Chic matstack.  Solids from my stash.  Used a Fiskars edge punch inside and out, and Cuttlebug Victoria embossing folder on the yellow cardstock and skirt of her dress.  The Happy Birthday stamp is TPC Studio and the other is a wooden stamp from my stash.  Oh, and I popped up the model with foam dots. Thanks for stopping by.

I'm entering this card into the following challenges:
Birthday Sundaes - a birthday card
You Had Me at Craft - linky party
Craft Junkie Too - linky party

Sunday, November 6, 2011

Thanksgiving/Fall Card

I haven't made any Thanksgiving cards in the past, but I recently purchased a Sampler Cartridge called Winter's in the Air Holiday, and it has images for the holiday season soon upon us (Thanksgiving, Christmas,and Halloween) among other cuts.  It actually includes images from a variety of existing cartridges, a few of which I already own.  I didn't realize that until I opened it, but it seems there are more images that I don't have than I do have on this cartridge, so still a worthwhile purchase.  Here's my card...

And here's how I made it:
This is a 5x7 cream colored card.
Patterned paper is Cloud 9 Design--Harvest, Halloween, Christmas Photo Mats
Brown satin ribbon
From my new Winter's in the Air Holiday cart, the turkey is cut at 2-1/2", the corn at 1-3/4", and the pumpkin is actually from Celebrate with Flourish at 1-3/4"
Stamp is a $1.00 stamp from Joann's.
Added some bling on the ribbon and some fall leaf brads in the upper corners.

I'm entering this card into the following challenges:
Celebrate the Occasion - Fall with a pumpkin
Karens Kakes Krafts - Thanksgiving card
Wacky Wednesdays - Buttons, Bling, Brads
Simply Crafts - create a critter turkey or any turkey

Thanks for stopping by!  I appreciate it!

Sharing a Huge Christmas Candy Giveaway

Check out Candy's Craft Corner.  She is giving away three seasonal Christmas cartridges based on how you enter. Click on the link above to read all about it.  The deadline to enter is December 15. 

Friday, November 4, 2011

Fancy Frames

Hi Everyone,

I bought the Fancy Frames cartridge a few weeks ago when it was on sale for $19.99 at Joann's!  I think this is one of what Cricut calls their project cartridges. My nephew's birthday is next week, and this picture of us was taken a few years back.  I've always liked it.  I thought he might like it too, so I made this frame to put it in. 
The cart has 20 different frame styles on it, 6 mats, two frame backs (one landscape, one portrait) and an easel you can make to hold a frame.
Isn't the detail gorgeous?!  And this was actually one of the simple cuts, I would say.  As you can see, I used shimmer paper for the top layer.

You cut the frame based on the size of your photo, or you can use the real dial size function.  My photo was 4x6, but I cut the frame at 5-1/2" because I wanted the opening to crop the photo a bit.  That worked and both layers fit together nicely.  What was tricky to cut was the back of the frame with the stand.  I left the setting at 5-1/2" and it cut at exactly 5-1/2".  So I had to use the real size button and select 7" to have the frame back fit the frame "front" if you know what I mean.  If anyone else has had this same issue, please let me know what you did to make the two parts fit.  Thanks for stopping by!

I'm going to put this card at two linky parties:

Wednesday, November 2, 2011

It's A Girl! Baby Card

I made this card for a woman at work.  She likes to give personalized cards to new moms.  I hadn't made one of these since I've had my Cricut.  (I used to use punched out balloons to put the personalized information on--see my "Earlier Cards" page for a laugh!).  Here's a "new" style card for a baby girl.


Here's how I made it
Card is 5 x 6.5"
Cardstock:  Baby animal cardstock is from DCWV Nana's Nursery, Baby Girl matstack. Blue cardstock is Heidi Grace, both inside and outside of the card.  MS Doily Lace punch used inside and out too.
Cartridge:  New Arrival, p. 98 Outfit cut at 4" blackout in pink patterned paper by Heidi Grace with green patterned shadow from same Heidi Grace cardstock pad; p. 107 2 booties cut at 1-1/4" blackout with same pink and green paper.  "It's a Girl" wording, p.90 cut at 1" shadow.
Wording:  Getting the wording to print in the center of each image was a little tricky, but I finally did it after several attempts practicing with white cardstock. This is the first time I used the Centerpoint key function on my Expression.  Great feature for centering your cut around a picture or wording, in my case.  Probably would have been a little easier to start with a photo!
Added some gems, white stitching with a gel pen, pink ribbon around the booties, and pink glitter ribbon for some pizazz.

I'm really pleased with the finished product.  Hope you like it too!  Thanks for stopping by.  I appreciate your visits!

I'm entering this card into the following challenges:
Whimsical Wednesdays:  anything goes
You Had Me at Craft - link up party
Paper Playtime - anything goes past or present
Scrapaholic by Abby - use GLITTER OR BLING
The Cuttlebug Spot- anything goes
 
>
Related Posts Plugin for WordPress, Blogger...