Thursday, December 29, 2011

Favorite Things

Several blogs are having linkup parties to post your "favorite things" from 2011--your favorite card or crafty project.  I have to agree with some others that it's hard to pick just one.  I have several that I'm posting below.
I made this for my daugther's 23rd birthday.  She grew up with cats, and she now has one of her own named Charlie.  I thought this image was so adorable, I couldn't resist it--especially since "she'll always be my little girl."  I later found out that this card didn't stay a keepsake too long.  Her cat got hold of it and tore the head off the little girl!! You can see the original post here.

This was the first mini-album I made from scratch all the way to binding it myself.  I was real pleased with how it turned out.  You can see the whole album at my original post here.


Here's one of the 3-D projects I made in 2011.  A woman at work used it for a gift box and card for her sister's birthday.  The cupcake is a card image from Hello Kitty.  Another 3-D project I really liked was a purse set from Forever Young. You can see more photos of that here.

And here's some decor for the kitchen.  This actually came out better than I imagined (although I apologize for the blurry picture).  It was made for a blog hop; the first one I ever participated in with Georgiana of Carson's Creations and still my good blogging buddy today.  Isn't that the best thing about blogger world?  Finding new friends who have the same interests as you?  You're ALL terrific, and I appreciate your friendships!

I made this card for my husband for our wedding anniversary. Loved the design and how it turned out to look like a wallpapered bathroom wall!  Love the inside too.

Sorry this is so long, just one more because it's just so darn cute.  How many of you like Create a Critter as your favorite cart!?  Well it's no wonder; it has the cutest images!  This is the kitty from that cart.  At the time I made it, I had no one particular in mind, but wound up giving to my niece for her birthday.  I just love this cut.

I am linking this post to the following blogs:

Happy New Year Everyone!!

Wednesday, December 28, 2011

Customized Baby Card

I made another boy baby card for the girl at work who likes to give them to her friends.  I get the name and statistics typed on patterned paper and then cut the image around that.


All images are cut from the cartridge New Arrival.  I like the way it turned out.  Sorry the colors don't match in the pictures, but they do for real--the real color is closer to the inside paper than the cuts on the front of the card (more gold-ish than orange-ish).  I think one picture was taken with a flash and the other without.  I really need to learn how to use the settings on my camera better!!

Monday, December 26, 2011

Christmas Gift Holders

I made these gift holders for the ladies at work.  There were two kinds--one to hold a candy bar and one to hold a packet of cocoa mix (these cocoa mixes are long and skinny; a little different size from traditional ones), so I searched Youtube to find this easy to make cocoa holder. 

Here's a close-up of the candy bar holder.  This is actually a gift card envelope, and is cut from Wild Card cartridge, pg. 46 <allinone>, fit to length (I think; sorry didn't write it down).  Then cut some cardstock and embellished it with Merry Christmas Sizzix folder.  The mice are cut from Winter Frolic, pg. 56, border.

And here is the cocoa mix holder.  The ribbon threads through a slot at the top (hidden behind the sentiment) on both sides, and actually holds the cocoa packet in place.  After tying a knot in the ribbon at the top, you can use the ribbon to pull up the cocoa packet.  Sweet!!


I made 5 sets using different patterned papers.  Here's all of them.
And a closeup of another set--you can really see the Merry Christmas embossing folder on the green cardstock in this one. 
 
  
And a few more of the cocoa packet holders that I made from the same patterned paper.


I'm entering my projects into the following challenges/linkup parties:
Robin's Creative Cottage Link-up Party - favorite project made within last month
Craft Junkie Too - link up party
Die Cuttin Divas - Create any Holiday Celebration idea...wall hangings, centerpieces, ornaments, layouts, gift boxes/bags, etc
Joyful Stamper - linky party

Friday, December 23, 2011

Another Christmas Tree Card

I wanted to share just one more version of the card I made using the tree from Winter Frolic.  I think this tree is soooo adorable.  Found this striped paper in my DCWV Christmas Matstack (great Xmas paper designs!!) and it matched the tree so perfectly.  I think it pops! Cut an oval and embossed it with Divine Swirls folder, and voila, an easy peasy card.

Gee, it's been a week since I last posted, and a very busy one at that.  Worked 3 days, took off today and yesterday.  We had a holiday luncheon at work and played Secret Santa with gifts. That's always fun.  Yesterday, I did all my wrapping, some cleaning, and today I did my food shopping.  My family (brother, sister and their kids) are coming tomorrow for Christmas Eve lunch, so I'm looking forward to that.  But I'm also looking forward to Christmas Day when I can "relax" with just my immediate family.  It should be nice and quiet, and we'll get to "try out" our new Christmas presents!

So how about you?  Are you ready??  Do you remember when you were a kid and you actually didn't mind going to bed early on Christmas Eve; in fact you probably wanted to! And then waking up the next morning at 5am, only to have your parents tell you to go back to sleep for a while!  Sleep, who could sleep?!  Then my mother would say to me, go open your stocking, and I would reply, "but I already did that!"  Oh to be a kid again.  How fun.  I'm at that in-between stage where our kids are grown and there aren't any grandchildren yet, but hopefully someday there will be little ones to make Christmas so much fun.

I hope all my bloggy buddies have a very Merry Christmas.  Enjoy the time with your family and friends! -- Pat

Friday, December 16, 2011

Typecast Creative Challenge

I'm entering this card into the Typecast Creative Challenge.  Deadline is tonight. You needed to use one of the cartridges of Curt Jensen, one of Provocraft's very talented creators.  I used the Father's Day cartridge where the comfy lounge chair came from.  The table is from Kate's ABC's; wreath from Celebrate with Flourish; cake from From My Kitchen; glass of milk from Simply Charmed.  The "wallpaper" is embossed with Sizzix Powdered Sugar (don't know why it's called that!).  And I even installed some baseboard moulding.  Oh, can't forget the Christmas lights!!  Hope you like it!

Thursday, December 15, 2011

Christmas Tree Link Up Party and Pink Challenge

Docerela Creations is doing something different.  She's having a link up party to show off your decorated Christmas tree.  All you have to do is post a picture of your tree with a link to her blog and you could win a set of her stamps.  Sounds like fun!  Here's my Christmas tree; now don't laugh.  I will explain.


Picture #1 shows our current Christmas tree, which is iron.  Picture #2 is why we switched to an iron tree.  That's our Christmas Kitty, Calbert.  He can't resist getting into stuff, and one year he decided he would like to taste our tree.  So he ate some of the artificial greenery and got really sick.  We wound up taking him to the pet emergency hospital on New Year's Eve.  Thankfully, he was okay after a not-so-pleasant treatment from the veternarian.  It could have been more serious, so we knew that in the future we would have to find another alternative for a tree.  Even today, Calbert still can't resist getting close to the tree!


And here's another challenge by Docerela.  Make a pink Christmas card.  I just made this pink and blue snowflake card that I want to enter.  She is giving away a set of her Christmas stamps to one lucky winner.  Check out her pink challenge here.

Thanks for stopping by!

Sunday, December 11, 2011

Snowflake Cards

I'm really trying hard to get my Christmas cards done--so I can move on to the next thing to get ready for Christmas!! YIKES! So much to do; so little time. How does this happen every year?!

Here's a card with blues, silvers, whites and lots of sparkle and bling.  Hope you like it!

This was one of those cards that the more I worked on it, the better I liked it.  Here's a snowflake before more bling.  It's okay, BUT...

Look at this ONE--isn't this one so much better all blinged up?  I love it!

And I cut double snowflakes and layered them with foam squares in between.

How I made it:
White A2 pre-scored card
Blue Snowflake paper that I bought at Joann's in single sheets.
White sparkly cardstock with silver flecks that I also bought at Joann's (5 for $1.00 sale).
The snowflakes were cut from Art Philosophy at 2".  This is <Snwflke2> on page 27.
Silver and blue ribbon.
Scalloped oval cut with Nestabilities set and stamped.  Took my silver metallic gel pen and inked around the edges.
Lots of blue gems!

Here's the whole card.  This one was fun to make.  The Art Philosophy cartridge has several snowflake images on it, so I think I'm going to try making a few more.

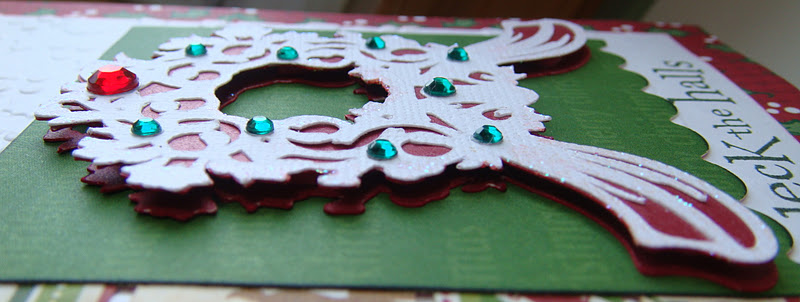
Here's another snowflake card using Art Philosophy cart and an A2 size card. This is <Snwflke1> on pg. 22.  I cut this one at 3" and then had a hard time figuring out how to use it!  But here's what I came up with.

It's a little hard to tell from the picture, but the green cardstock is glitter paper and the gold is shimmer cardstock.  Glitter and shimmer!  Both from DCWV.

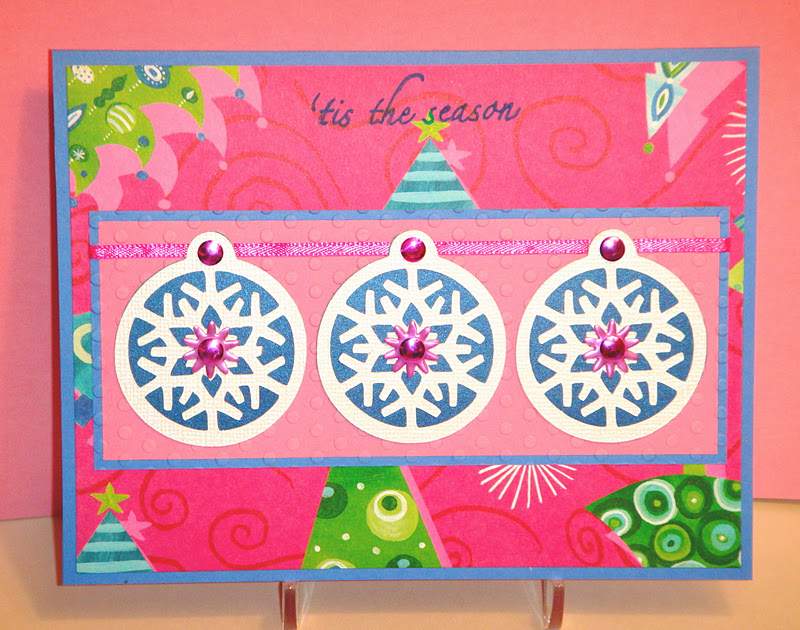
And here's yet another snowflake card from Art Philosophy.  This is <Snwflke3> on pg 31.  This time I cut  it using the Tag feature at 2".

I made this 5x6.5" card using blue cardstock.  The patterned paper is from K&Company Secret Santa 12x12 paper pad.  So cute, and sometimes crazy-looking, paper!  Pink cardstock from my stash and I embossed the matting with Polka Dots Cuttlebug folder.  I think that may be it for the snowflake cards! Thanks for stopping by.

Saturday, December 10, 2011

Funny Little Christmas Tree

I think this is such a cute tree from the Winter Frolic cartridge.  Here's what I made with it:
How I made it:
Pre-folded A2 red card
DCWV Christmas Matstack (135 pages!) paper used for the frame, using Elegant Edges, cut at 5-1/4", Oblong Frame, pg. 52, <Eyelet2>.
White gel pen to faux stitch around the scalloped edges.
Christmas tree from Winter Frolic cut at 3-1/2" with white glitter cardstock shadow. 
Patterned paper on the tree is from K&Company Secret Santa (2-sided).
Hole punched red and yellow dots for the ornaments from glitter cardstock.
Popped up the tree on foam dots.

Kinda simple!  Yeah, right--once you get the first one done!

So on the inside, I used the Elegant Edges cart and cut just the Oblong on pg. 52 so it was solid.
Stamped the sentiment with a wooden stamp from my stash.  I never noticed this before, but look closely at the berries on the holly!


Thanks for stopping by.

Friday, December 9, 2011

3 Birds on Parade

Hi All,

I've been wanting to share these two Christmas cards I made last weekend.  These colors are so untraditional for me to use for Christmas, but I knew when I bought this cartridge, I just had to use this bird on a Christmas card, and I already knew the exact sentiment for it, too.  Didn't know I'd pick these colors, but here they are.

I first cut the bird at 5" and then soon realized he was going to be pretty big!  So I worked on these two cards side by side by cutting the next bird at 4-1/2".  I try hard not to waste too many cuts, so I was using them one way or the other!  These cards are 5x7 so I think they still came out pretty good.  Tried to keep things simple for mailing purposes.  A little bling, PK eyes, snowflake border punch, and Cuttlebug Swiss Dots and Herringbone embossing folders. What do you think?


Thanks for stopping by; I really enjoy reading your comments!

Tuesday, December 6, 2011

My Blogaversary Challenge Winner!

Hello My Crafty Friends!

Well, now it's official; it's been one year ago since I started my blog, and I'm happy to say, I'm still here!  And I plan to be around for a lot longer.  I don't have a card to post tonight, but more importantly, I'm here to reveal the winner of my Blogaversary Challenge.  I want to thank EVERYONE for the kind comments you left about my blog and for following me all this time.  I appreciate all my followers!!  And I know it is a terribly busy time of year, so to all of you that were able to find the time to enter my challenge, I say THANKS SO MUCH!!!  And now I need to let you know who won.

Everyone who made a card got an entry, and if you posted about my challenge on your blog, you got a second numbered entry.  I used random.org to select the winner who was number...9!

Elaine of Elaine's Expressions

Congratulations Elaine!  Send me your addy and I'll get the cart out to you asap.  My email is in my profile.

Again, thanks everyone.  Next time I post I should have a Christmas card or 2 to share! -- Pat N.

Friday, December 2, 2011

Four Days Left to Enter My Challenge!

Hi Everyone,

I want to remind you that I am holding a challenge to celebrate my one-year blogaversary, and giving away the Phrases cartridge to one lucky winner!  

I bought 2 of these carts; one for me and one to give away, and I wanted to share with you two cards that I made for Christmas.


This cart is full of holiday greetings, sentiments, and other fun expressions.  I can also see where it will really be great to use for your scrapbook layouts. 
For a chance to win this cartridge, do the following:
  1. Be a follower of my blog, AND
  2. Create a project (card, layout, anything you'd like) to celebrate my one year blogaversary, and have fun with it!
  3. For an extra entry, post my challenge on your sidebar and let me know that you did that by leaving me a separate comment.
There's only 4 days left to enter!  The challenge will be open until midnight EST on Monday, December 5, and I'll pick a winner by random.org on December 6.  I've even created a link below for you to post your projects.  I can't wait to see what you make!!!  THANKS TO YOU ALL!  Go here to upload your project.

Tuesday, November 29, 2011

Die Cuttin' Divas Guest Designer

Hello All,

Today I am Guest Designing at Die Cuttin' Divas!  This is a first for me, so I'm very excited to share my first Christmas card for this season.  Yes, I need to get busy, I know.  This week is sketch week at DCD, and this was just the motivation I needed to get started.  I'm pleased with how my card turned out.  Let me know what you think.  And then be sure to visit Die Cuttin' Divas to see what the Design Team has made!!


Here's a close-up of the wreath.  Don't you just love these intricate cuts?!

I cut two wreaths and put foam dots in between to layer them.  I really love that look!


And here's the inside of the card which I wanted to match the front, so I bordered the edges with the patterned paper.


Here's the details for my card:

Card is 5-1/2" square.
Red holly patterned paper is from my stash, cut at 5-1/2" to cover the front.
White cardstock is cut at 4-3/4" square and embossed with a Sizzix folder called Snow Globe (for some reason); it's holly and berries design as I hope you can see in my photos.
Merry Christmas paper from my stash for the green mat which I punched with a Fiskars scalloped border punch, and inked the edges. 
The wreath is cut from Trim the Tree seasonal cartridge at 2-3/4".  This cartridge is very, very intricate and cuts best at larger sizes.  But even at this small size, it cut pretty well.  I used adhesive backed cardstock which made it much easier to apply to the underneath layer of red shimmer paper (DCWV).
The banner tags are cut from one 4x6 piece of patterned paper from the DCWV Christmas Combo matstack and inked with Jim Holtz Antique Linen distress ink.
Deck the Halls was $1.00 sentiment from Joann's that I picked up last year.

I'm going to also share this card at You Had Me at Craft link up party.

Thanks for stopping by my blog!  I appreciate all your comments! -- Pat N.

Sunday, November 27, 2011

Welcome New Baby Boy

Here's a card I made for a woman at work.  She gives cards to family and friends with new babies.  This one is for a new baby boy, and I've covered his name in my photo.


I even finished off the inside with coordinating papers and a few Cricut cuts. Couldn't resist!

All the cuts are from New Arrival Cartridge.  The onesie is cut at 4" with shadow; the booties are cut at 1-1/4" w/shadow, and the circle emblem is cut at 2-1/4".  Papers are from DCWV Nana's Nursery-Baby Boy.  Solids come from my stash.  The duck on the onesie is an EK Success punch--isnt't that so cute?!

Thanks for stopping by!  Your comments are welcomed and appreciated.--Pat N.

Monday, November 21, 2011

Ready for Thanksgiving?

IF YOU'RE LOOKING FOR MY BLOGAVERSARY CHALLENGE, CLICK HERE.

Are you almost ready for Thanksgiving?!  Just a few more days to that delicious turkey, stuffing, mashed potatoes, green beans, and sauerkraut! Are you having a similar menu?  Here's a card I made to enter in a few challenges, and to wish everyone a Happy Thanksgiving!

I can see why so many of you used the turkey cut from Create a Critter for your turkey cards!  It's so darn cute!!

How I made this card:    This is a 5x7 card.  I used an orangey/rust colored cardstock for the base.  The background paper is script on a tannish colored paper with subtle hues of orange and green from my stash.  Used green textured cardstock for the strip of matting and for the corners which were punched with an EK Success punch (I love that punch).  Stamped the sentiment on the script paper, trimmed and adhered it to the green strip, and added 2 orange brads.  That is all placed over the same striped paper I used on the turkey, punched with a new border punch I just got by Fiskars called Diamond.  I'm entering this card into the following challenges:

Wacky Wednesday - Thanksgiving project
Die Cuttin Divas - Turkey time
The Cuttlebug Spot - Thanksgiving with a turkey
Whimsical Wednesday - Thanksgiving theme
Cooking with Cricut - Let's Talk Turkey

Please check out my Blogaversary Challenge for a chance to win the Phrases cartridge!  You have until December 5 to enter.  Thanks so much for stopping by!

Friday, November 18, 2011

Are You Ready for a Challenge?

Hello All My Blogging Buddies!!

Are you up for a challenge?  For what, you ask?  Well, it is hard to believe, but I am coming up on my one year blogaversary!  Imagine that!  Yep, it was on December 6, 2010 that I made my first post; it was a birthday card that I entered into a My Pink Stamper challenge.  I was looking back at that and other very early posts, and many of you that visit me regularly now were my VERY FIRST visitors then.  That is pretty amazing, and YOU ARE ALL AMAZING!  I am so thankful and touched by all the sweet blogging buddies I've made over this past year, and it's so enjoyable to communicate with you day to day!  I've never been this passionate about a hobby before that I've actually stayed active with for so long!! (both blogging and crafting!!) It's been wonderful!!

To show my gratitude, I'm having a super giveaway (at least I hope you'll think so!).  It's one of the newer cartridges--Phrases.  I don't think this cartridge has been showcased very much in bloggy world, but I think it's really neat--it has so many phrases included on it, and not just the normal holiday greetings; there's SO much more.  Take a peek at the look book on the Cricut site and you'll see what I mean.

For a chance to win this cartridge, do the following:
  1. Be a follower of my blog, AND
  2. Create a project (card, layout, anything you'd like) to celebrate my one year blogaversary, and have fun with it!
  3. For an extra entry, post my challenge on your sidebar and let me know that you did that by leaving me a separate comment.
The challenge will be open until midnight EST on Monday, December 5, and I'll pick a winner by random.org on December 6.  I've even created a link below for you to post your projects (how 'bout that!?).   I can't wait to see what you make!!!  THANKS TO YOU ALL!

Wednesday, November 16, 2011

The Color Purple

A woman at work asked me to make a card for her sister's 21st birthday, and she told me her sister's favorite color is purple.  I made a similar card back in June for my niece, using different colors.  Here's a purple (and some pink) version.  This cartridge is so fun!
Details for making this card:
Forever Young cartridge; Model 15 cut at 5-1/4" with shadow; mirror cut at 4" with shadow
K&Company Watercolor Bouquet paper; DCWV shimmer purple and silver, pink scraps
Pink gem added to top of mirror; purple gems at the bottom of the card.  I felt like the card needed some more sparkle, so I put pink glitter glue around the mirror as well as on the scalloped edges of the pink strip.

Sunday, November 13, 2011

Little Girl Birthday Card

My daughter needed a birthday card for a little girl's birthday who is just turning 1.  Here's the card I made.   It's a 5x7 card.  I used Birthday Cakes cartridge to cut the princess and the wording with shadows.  And now I can't remember what cart I used to get the background tag since I made this Thursday night! 


Ran the background mat through my Sizzix using the Cuttlebug Polka Dots embossing folder, added a ribbon, and some bling, and there you have it!  Thanks for stopping by!
>
Related Posts Plugin for WordPress, Blogger...